The Battleground of Iwo Jima: A Detailed Analysis of the Iconic Map
Related Articles: The Battleground of Iwo Jima: A Detailed Analysis of the Iconic Map
Introduction
In this auspicious occasion, we are delighted to delve into the intriguing topic related to The Battleground of Iwo Jima: A Detailed Analysis of the Iconic Map. Let’s weave interesting information and offer fresh perspectives to the readers.
Table of Content
The Battleground of Iwo Jima: A Detailed Analysis of the Iconic Map

The battle of Iwo Jima, a pivotal clash in the Pacific theater of World War II, remains etched in history for its ferocity and the iconic image of the American flag raised atop Mount Suribachi. Beyond the dramatic imagery, the battle was fought on a terrain that shaped the course of the conflict. Understanding the battle map of Iwo Jima is crucial for grasping the strategic complexities and the brutal realities of this campaign.
A Volcanic Island of Strategic Importance:
Iwo Jima, a small volcanic island in the Pacific Ocean, held immense strategic significance for both the United States and Japan. Situated approximately 660 miles south of Tokyo, the island offered a critical staging point for American forces. Its airfields could be used to launch bomber attacks on the Japanese mainland, shortening the distance and reducing the risk for B-29 Superfortress crews. For the Japanese, Iwo Jima served as a vital defensive outpost, protecting their homeland from the encroaching American forces.
The Terrain: A Fortress of Fire and Steel:
The island’s terrain presented a formidable challenge for the invading American forces. The volcanic landscape was characterized by steep cliffs, jagged ridges, and numerous caves and tunnels. The Japanese, under the command of Lieutenant General Tadamichi Kuribayashi, had meticulously fortified the island, turning it into a veritable fortress.
The Battle Map: A Visual Representation of the Struggle:
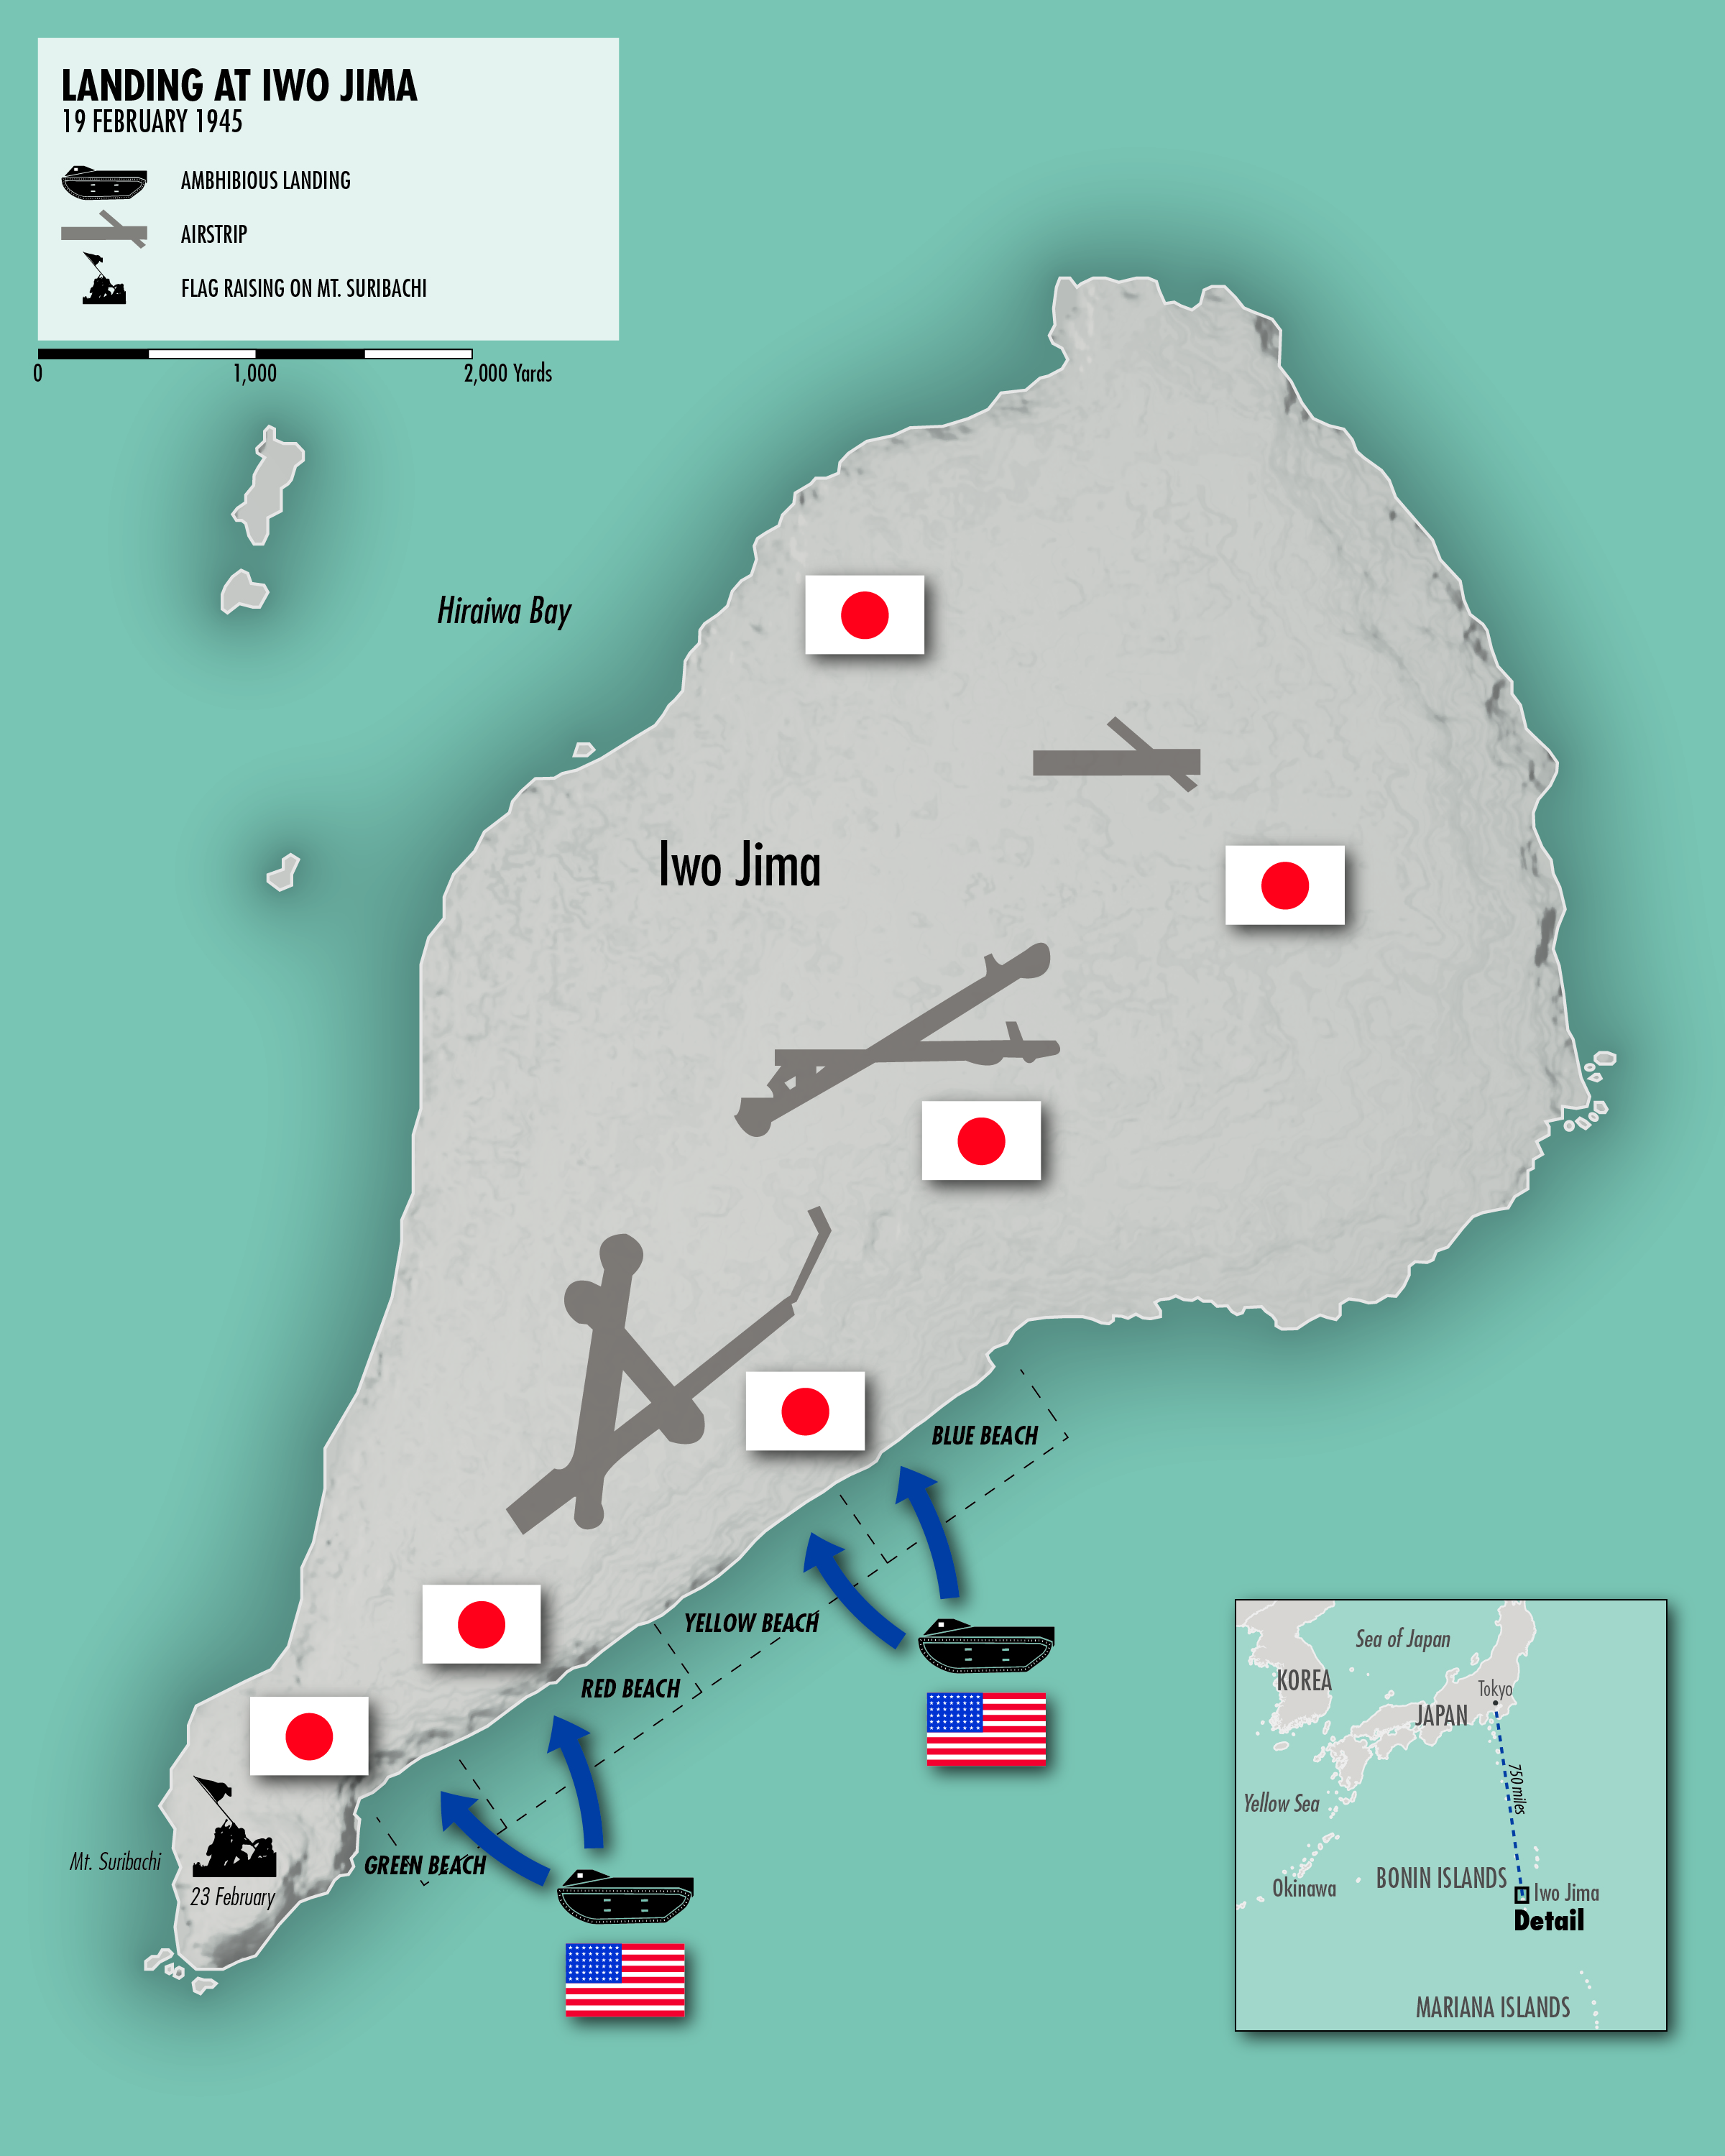
The battle map of Iwo Jima is a critical tool for understanding the strategic movements and the brutal realities of the fighting. It depicts the island’s key geographical features, including:
-
Mount Suribachi: This iconic volcano, rising 546 feet above sea level, dominated the southern tip of the island. Its strategic location offered a commanding view of the surrounding terrain, making it a crucial objective for both sides.
-
The Airfields: Two airfields, designated as "North Field" and "South Field," were strategically located on the island’s flatlands. Their capture was essential for the Americans to establish a secure base for their air operations.
-
The "Moat" and the "Cinder Cone": The Japanese had constructed a series of defensive lines, utilizing the island’s natural features. The "Moat," a deep, narrow ravine, formed a natural barrier, while the "Cinder Cone" served as a strongpoint, offering excellent defensive positions.
-
The Caves and Tunnels: The Japanese skillfully utilized the island’s volcanic terrain, constructing a network of caves and tunnels that provided shelter and facilitated surprise attacks. These subterranean fortifications posed a significant challenge to American forces, making it difficult to root out the defenders.
The Battle’s Progression: A Grueling Struggle:
The battle for Iwo Jima unfolded in a series of fierce engagements, each marked by intense fighting and heavy casualties. The American forces, under the command of Lieutenant General Harry Schmidt, faced a formidable defense, encountering fierce resistance at every step.
-
The Initial Landings: The American invasion commenced on February 19, 1945, with the landings on the island’s beaches. The initial assault faced heavy fire from the Japanese defenders, resulting in significant casualties.
-
The Battle for Mount Suribachi: The capture of Mount Suribachi became a symbol of the battle’s ferocity. The fighting for the volcano was brutal, with the Japanese defending their positions with relentless determination. The iconic image of the American flag being raised atop Mount Suribachi captured the symbolic significance of the victory.
-
The Battle for the Airfields: The capture of the airfields was crucial for the Americans to establish air superiority. The fighting for the airfields was equally fierce, with the Japanese using their defensive positions to inflict heavy casualties on the advancing American forces.
-
The Final Stages: The battle dragged on for a month, with the Japanese defenders fighting to the last man. The American forces employed a combination of brute force and strategic maneuvering to overcome the Japanese resistance. The final Japanese surrender occurred on March 26, 1945, marking the end of one of the most brutal battles in the Pacific theater.
FAQs about the Battle Map of Iwo Jima:
-
What was the significance of Mount Suribachi in the battle? Mount Suribachi’s strategic location offered a commanding view of the surrounding terrain, making it a crucial objective for both sides. Its capture was a significant symbolic victory for the American forces.
-
How did the Japanese fortifications impact the battle? The Japanese fortifications, utilizing the island’s natural features and extensive cave systems, posed a significant challenge to American forces. They slowed down the advance, inflicted heavy casualties, and made it difficult to root out the defenders.
-
What role did the airfields play in the battle? The airfields were critical for both sides. For the Americans, they provided a staging point for bomber attacks on the Japanese mainland. For the Japanese, they were vital for defending their homeland.
-
What were the casualties of the battle? The battle of Iwo Jima was one of the bloodiest in the Pacific theater. The Americans suffered over 26,000 casualties, while the Japanese suffered over 20,000.
Tips for Understanding the Battle Map of Iwo Jima:
-
Study the terrain: Understanding the island’s topography, including the volcanic features, cliffs, and caves, is crucial for comprehending the strategic considerations of the battle.
-
Focus on key locations: Pay attention to the strategic significance of key locations, such as Mount Suribachi, the airfields, and the defensive lines.
-
Analyze the battle’s progression: Trace the movement of the forces and understand the key engagements that shaped the course of the battle.
-
Consider the casualties: Remember that the battle map represents a human cost. The casualties of the battle highlight the brutality of the conflict and the sacrifices made by both sides.
Conclusion:
The battle map of Iwo Jima serves as a powerful reminder of the strategic complexities and the human cost of war. It depicts a landscape that was transformed into a battleground, where every inch of ground was fiercely contested. By studying the map, we gain a deeper understanding of the strategic considerations, the military tactics, and the sacrifices made during this pivotal battle of World War II. It remains a testament to the resilience of the human spirit, the horrors of war, and the enduring power of the human will to overcome seemingly insurmountable odds.


![Map of The Battle of Iwo Jima [1997x1531] : MapPorn](https://external-preview.redd.it/1Xb1ZxkAWKS2EBveiomiEXjNEjcCBXpsItWP0ZZPDIk.jpg?width=1200u0026height=628.272251309u0026auto=webpu0026s=1b4075d2579ae3ac64828c0539f3d49f93dca291)


Closure
Thus, we hope this article has provided valuable insights into The Battleground of Iwo Jima: A Detailed Analysis of the Iconic Map. We thank you for taking the time to read this article. See you in our next article!